If you have installed any of the applications developed by Microsoft on your computer, then you will find the Microsoft AutoUpdate app on your device. The app won’t appear in the Launchpad or anywhere else, but it is installed and works in the background. So how to remove Microsoft autoupdate from mac device?
What is Microsoft AutoUpdate in Mac?
As the name indicates, the app automatically updates the Microsoft programs on your Mac device. It automatically installs several bug fixes and performance improvements, apart from adding new features.
The app can take up an unnecessary amount of CPU usage, impacting the system's overall performance. Also, sometimes it throws notices and notifications on the screen, making the experience a bit annoying.
How to Remove Microsoft AutoUpdate from Mac Device
When installed, Microsoft autoupdate creates files in several locations. Generally, its additional files, such as preference and application support files, remain on the hard drive after you delete Microsoft AutoUpdate from the Application folder.
In case the next time you decide to reinstall it, the settings of this program still are kept, but how to remove Microsoft autoupdate from mac device?
You may also like to read:
- Tips to Get Google AdSense Approval with New Website
- Solutions to Fix Steam Voice Chat not Working in Windows 10
- Ways to Fix; Unfortunately TouchWiz Home has Stopped Error
- Best Live Net TV App Alternatives
- How to Fix Hulu Error Code 301 Easily
Continue reading this article to learn about the proper methods for how to remove Microsoft autoupdate from mac devices:
How to Modify Microsoft Autoupdate's Configuration
If you'd instead not delete Microsoft AutoUpdate, there are other ways to end its high CPU usage and random pop-up notifications. You can achieve this by disabling the app or revoking its notification permission.

In this sense, disabling Microsoft AutoUpdate means preventing the app from performing its primary assignment of automatically updating other Microsoft apps.
Remove Microsoft AutoUpdate From Mac Device in: 13 minutes
-
Launch Finder
Launch Finder and type microsoft autoupdate in the search bar, and double-click Microsoft AutoUpdate in the search results to launch the app.
-
Uncheck Box
Uncheck the ‘Automatically keep Microsoft apps up to date‘ box.
-
Tap Off
Tap Turn Off to proceed.
-
Final Step
That's it. Microsoft AutoUpdate will no longer use your Mac's CPU in the background.
Microsoft AutoUpdate is a third-party application that provides additional functionality to the OS system and enjoys popularity among Mac users.
Microsoft AutoUpdate is an application component designed for Mac operating systems and is used to support and update MS Office and other Windows programs that run on Macs.
How to Remove Microsoft AutoUpdate from Mac Device
However, instead of installing it by dragging its icon to the Application folder, to remove Microsoft autoupdate from mac device, you may need to do more than a simple drag-and-drop to the Trash.
Remove Microsoft AutoUpdate from Mac Device
1. From the Finder of MacOS, pull down the “Go” menu and choose “Go To Folder” (or hit Command+Shift+G), and enter the following path:

/Library/Application Support/Microsoft/

2. Locate the folder named something like “MAU” or “MAU2.0” and open that directory.

3. Locate and drag “Microsoft AutoUpdate.app” to the Trash.
4. Empty the Trash as usual.
5. Close the MAU folder and continue using your Mac as usual.
With Microsoft AutoUpdate deleted, Microsoft AutoUpdate will no longer be on the Mac or run to update software automatically.
Microsoft AutoUpdate Manual Removal for Mac
The good thing is that you can easily remove Microsoft autoupdate from mac device. This step-by-step guide will show you can quickly remove the Microsoft AutoUpdate app from your macOS-powered device.
Launch the Finder app

Launch the Finder app on your macOS-powered device and type “microsoft autoupdate” in the search bar.
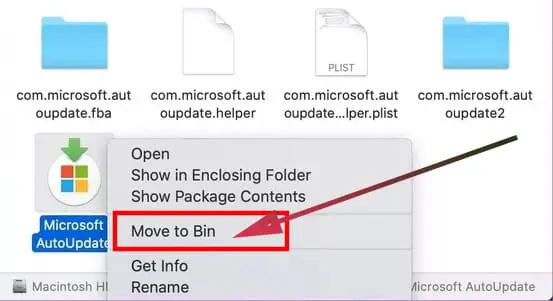
Click ‘Move to Bin

Right-click on the Microsoft AutoUpdate program from the search results and click on the ‘Move to Bin’ option.
Authenticate the Deletion
It will now ask you to enter your Mac’s password. Or, if you have enabled Touch ID, you can authenticate the deletion process using your fingerprint.
More interesting topics for you:
- Easily Install Google Analytics on WordPress in 10 Minutes
- Why Tablets are Better than Smartphones for 11 Reasons
- Best Rated Craigslist Apps for Android and iOS
- How to Easily Transfer Photos from Android to iPhone – 7 Solutions
- Easy Ways to Unsend or Recall an Email in Gmail
To remove Microsoft autoupdate from the mac device, we recommend deleting all of its associated files and folders.
- Select Go from the menu bar at the top.
- You should click on Go to folder

- Type “~/library/” in the box, and hit on the Go key.
- Find and click on the folder with the Application Support name and delete files and folders belonging to Microsoft AutoUpdate.

- Open the Caches folder, and remove Microsoft AutoUpdate’s caches inside.
- Continue to open the Preferences folder in the library and delete those preferences of Microsoft AutoUpdate.
To Delete or Not?
With this new knowledge, we hope you now understand what Microsoft AutoUpdate does on your Mac and when it should be deleted or temporarily disabled.
To recap, we recommend deleting the program if you have no Microsoft app installed on your computer. Otherwise, disabling it is a much better option. You get to eliminate the app’s excessive CPU consumption and curb the ongoing pop-up notifications.
Conclusion – How to Remove Microsoft AutoUpdate from Mac Device
So, it was the guide to the Microsoft AutoUpdate complete removal – you should no longer receive the prompts about the seemingly necessary update.
That’s how you can thoroughly uninstall Microsoft AutoUpdate correctly and entirely from your Mac.


