Windows 10 internet not working after applying the latest windows 10 update? Have network and internet connection issues or network adapters stopped working after using windows update and Windows 10 internet not working? You are on the right post to solve Windows 10 Internet connection problems and windows 10 internet not working after updates.
Examples of Error Messages
- Windows 10 update lost internet connection – This error message means you’ve lost the internet connection after installing specific updates.
- Can’t connect to the internet after Windows 10 update – As the error message says, this particular issue occurs in Windows 10.
- Windows update no internet connection – It can also happen that you lose the internet connection while installing Windows Updates.
Microsoft regularly releases new windows updates for Windows 10 to improve the performance and patch security vulnerabilities. Still, several windows users report the intermittent loss or slow connection speeds of Wi-Fi connectivity or Windows 10 internet not working that prevents accessing the web.
The common reason for this problem about Windows 10 internet is not working could be the network adapter driver either outdated, corrupted, or incompatible with the current windows version. Again the physical connection, incorrect network configuration, VPN, proxy, or firewall may also block accessing the internet. Whatever the reason, here are the solutions that apply to get back online again.
Windows 10 Internet not Working Common Solutions
When your computer is experiencing network problems after installing a quality update, basic troubleshooting steps can quickly help you get back online. Let's start with basic troubleshooting for Windows 10 internet not working.
Fix Windows 10 Internet Not Working After Windows Update in: 36 minutes
-
Check the physical connections.
Check the physical connections before getting too involved with troubleshooting. May someone accidentally kicked the router or modem’s power cable or pulled an Ethernet cable out of a socket, causing the problem.
-
Restart network devices.
Restart all network devices, routers, modem, switches, including your PC, that fixes the problem if a temporary glitch causes the issue.
-
Check the physical Wi-Fi button.
If you are using a laptop and having a problem connecting the wifi network, make sure that you turn on your laptop's physical Wi-Fi button.
-
Check time-zone.
Check the Region, date & Time settings are correct according to your time zone.
-
Check the Antivirus firewall.
Check your Antivirus firewall that may block internet access, Again disconnect from VPN if configured on your PC.
You may like to read:
- 5 Reasons – Why Tablets are Better than Smartphones
- 9 Best Rated Craigslist Apps for Android and iOS
- 3 Easy Ways to Unsend or Recall an Email in Gmail
- How to Overcome Wireless Car Charger Problem
- Best Fake Email Address Generators – Get Free Temporarily Email
Run the Internet Troubleshooter
Run the build-in internet troubleshooter that automatically detect and correct network configuration settings that may prevent internet access. Again run the troubleshooter for the Network adapter that checks for errors driver issues and helps windows 10 pc get back online.
- From the start menu, search for and select troubleshoot settings,
- The troubleshooting window opens, scroll down and locate Internet connections, select it,
- Now click run the troubleshooter to start the diagnosis process,
- This will automatically detect and fix problems with connecting to the internet or web pages

- Once the troubleshooting completes, locate the network adapter, select it,
- Then click Run the troubleshooter that helps fix problems with wireless and other network adapters.
- After completing the diagnosis process, restart your PC and check if windows allow visiting web pages.
Disable Antivirus and Firewall

Third-party antivirus programs don’t go along with Windows updates.
Therefore, your antivirus may cause problems after installing the update. So, consider disabling your antivirus temporarily and check if you’re able to connect to the internet.
Check Network Configuration
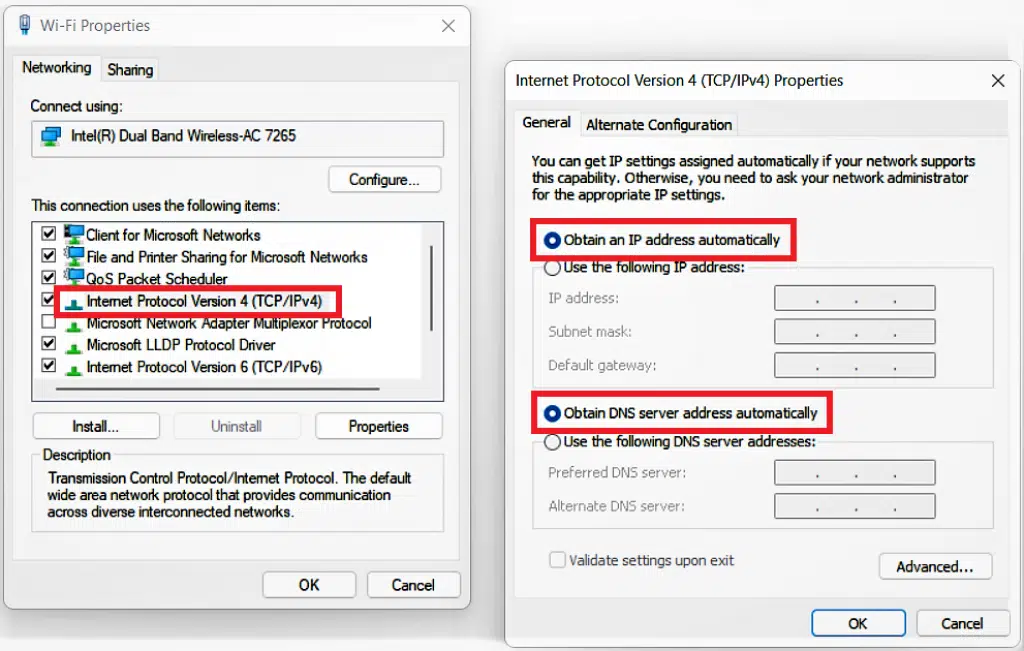
In the next step, you should check your computer has a valid IP address. If your computer’s IP settings aren’t correct, it can cause this “no internet access” or “Wi-Fi doesn’t have a valid IP configuration” error.

- Press Windows + R, type ncpa.cpl, and click ok,
- This will open the network connections window,
- Right-click on the active network adapter, select properties,
- Find Internet Protocol Version 4 in the list and double-click that.
- Here, make sure you have to Obtain an IP address automatically and Obtain DNS server address automatically, both selected.
Switch to Google DNS
Domain Name Servers (DNS) play an essential role in accessing web pages that maintain a directory of domain names and translate them to Internet Protocol (IP) addresses. Let’s switch to Google public DNS; that probably helps resolve if you have issues Connected to Ethernet or Wi-Fi, But No Internet Access in Windows 10.

- Again open network connection using ncpa.cpl
- Go to properties of the active network adapter,
- Double click on Internet Protocol Version 4,
- Here select the radio button Use the following DNS server address, then set preferred DNS server 8.8.8.8 and Alternate DNS server 8.8.4.4
- Checkmark on validating settings upon exit and click ok.
- Now open the web browser and visit any web pages.
Run Network Troubleshooting Commands
Still, need help? Let’s reset the TCP/IP configuration following the steps below. In this method, you will need to run specific Network Troubleshooting Commands to Reset the TCP/IP Stack, Release IP address, Renew IP address, and Flush and Reset the DNS client resolver cache.
Open the command prompt as administrator and perform the following commands one by one.
- netsh winsock reset
- netsh int ip reset
- ipconfig /release
- ipconfig /renew
- ipconfig /flushdns
Once done, restart your PC to effect the changes. Now open any web pages and see if the problem is solved.
Update Driver for the Network Adapter
Again, your computer's network connectivity problem could be due to an outdated Network Adapter Driver, significantly if you have recently upgraded to Windows 10 and if your computer has not installed an update for the Driver.
To update the Driver, you will need another computer with a working internet connection.
Windows 10 Internet not Working After Windows Update
Visit the website of your Network Adapter manufacturer, download the latest drivers to a USB drive, and follow the steps below.
- Right Click on Windows 10 Start button and click on Device Manager from the menu that pops up.
- On the device Manger Screen, click on Network Adapters to expand the entry. This will list all the network adapters that were installed on your computer.
- Right-click on the Network Adapter for your computer and click on Update Driver Software from the expanded list.
- Next, follow the instructions to install the updated driver that you had downloaded to the USB drive.
- After installing the updated driver, Restart the computer and see if the network connectivity problem on your computer has been fixed.
Roll Back Network Adapter Driver

If the problem only started after you upgraded the Network Adapter Driver, this method may assist you in connecting to the internet.

- Right Click on Windows 10 Start button and click on Device Manager from the menu that pops up.
- On the Device Manager screen, click on Network Adapters to expand the entry.
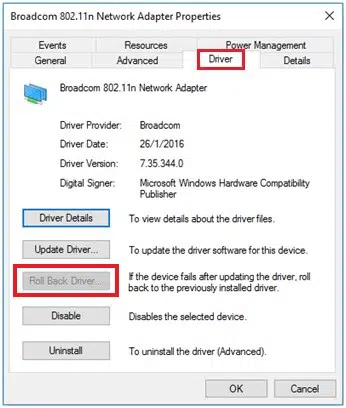
From the expanded list, - Right-click on the Network Adapter for your computer and click on Properties.
- In the Properties screen, click on the Driver tab and select Roll Back Driver.
- If the Roll Back Driver button is unavailable, there is no Driver available to roll back to.
- After rolling back to the driver's previous version, restart your computer for the changes to take effect.
Restart the DNS Client service
This solution especially helps after the Windows 10 v20H2 update, but it also applies to any other build of Windows 10.
- Launch the Services console (
services.msc) - Make sure that the DNS Client service is running and set to Automatic start
dnscache) caches Domain Name System (DNS) names and registers the full computer name for this computer. If the service stops, DNS names will continue to resolve. However, the results of DNS name queries will not be cached and will not register the computer’s name.
If the DNS Client service is not running or disabled, you can set it to Automatic using the following command:
reg add "HKLM\System\CurrentControlSet\Services\Dnscache" /v "Start" /t REG_DWORD /d "2" /f
Uninstall Network Adapter Driver
Suppose you cannot fix the problem after trying to update the Driver, uninstalling the Driver, and allowing your Windows 10 Computer to reinstall back automatically. In that case, a New Driver might help fix the network connectivity problem on your computer.
Before uninstalling the Driver, it is recommended that you create a Manual Restore Point on your computer so that you can restore your computer using the restore point in case Windows 10 is unable to reinstall a new Driver and the existing driver gets deleted.
Windows 10 Internet not Working After Windows Update
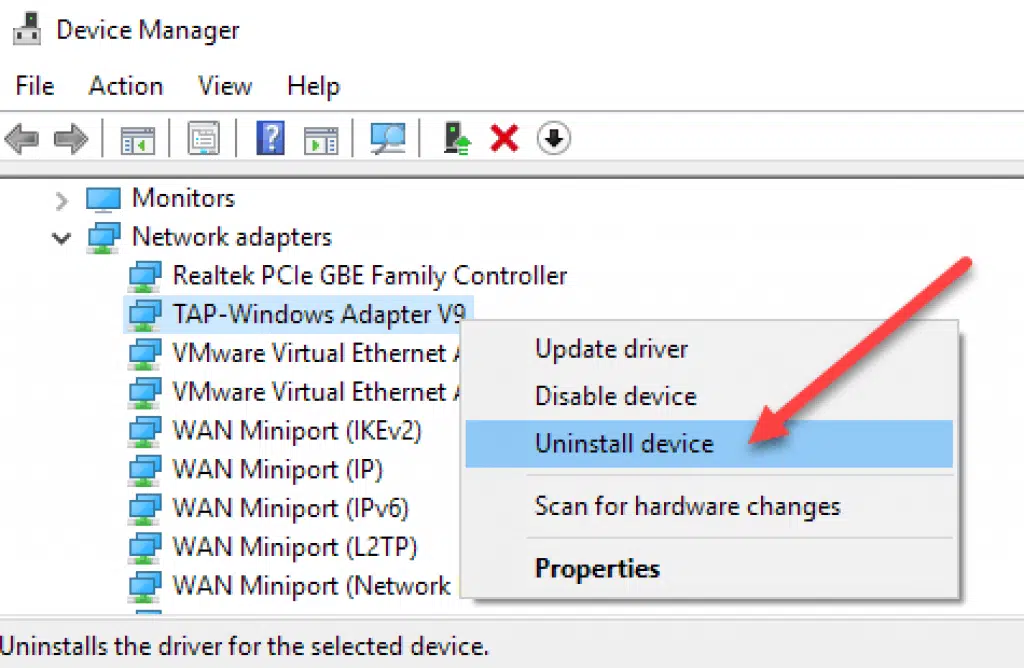
Right Click on Windows 10 Start button and click on Device Manager from the menu that pops up.

- On the device Manger Screen, click on Network Adapters to expand the entry. This will list all the network adapters that were installed on your computer.
- From the expanded list, right-click on the Network Adapter for your computer and click on Uninstall.

- You will see a popup warning saying, “You are about to uninstall this device from your computer,” click on OK to Uninstall.
- Restart your computer; Windows should automatically reinstall the right Driver for the Network Adapter.
As mentioned above, in case of a problem, you can easily undo the changes on your computer and get back to where you were by restoring your Computer using a Manual System Restore Point that you had created before going ahead with these steps.
More top resources for you:
- 7 Solutions to Fix Steam Voice Chat not Working in Windows 10 Easily
- 15 Ways to Fix Download Pending Error in Google Play Store
- Fastest Best Android Browsers
- Ways to Earn Money Online Without Investment
- 9 Best Live Net TV App Alternatives
Use Network Reset to Reinstall Network Devices
Well, you’ve proceeded through all these steps for Windows 10 internet not working and still have Internet connection problems; there’s not much you can do other than reset your network settings. It removes any network adapters you have installed and the settings for them. After your PC restarts, it will reinstall network adapters and restore their default settings.
- Open settings using keyboard shortcut Windows + I
- Click on Network & Internet then Status,
- Now on the right-hand side scroll down and click on the network reset link

- A new window opens with an option to reset network reset, click the reset now button,
- Again click yes when asking for confirmation,
- Wait for your PC to restart and see if that fixes the problem.

FAQs About Can't Connect to Internet After Windows 10 Update
-
How to Fix Windows 10's Latest ‘No Internet Connection' Bug?
First, search for “Registry Editor” using the search bar in the Windows taskbar. Open Registry Editor and click “Yes” when prompted to let the app make changes.
In the Registry Editor app, go to:
HKEY_LOCAL_MACHINE\SYSTEM\CurrentControlSet\Services\NlaSvc\Parameters\Internet
Then Right-click “EnableActiveProbing” select Modify and change the “Value data” from 0 to 1.
Click “OK” to close the window and save your edits. -
Why is my internet not working on Windows 10?
If your Windows 10 PC is the only device you can't connect with, to fix Windows 10 internet not working, you can reset your network by visiting Settings > Network & Internet > Status. Click the network reset text at the bottom of the screen, then Reset now.
-
Can't connect to the Internet after Windows Update?
To fix Windows 10 internet not working, go to Device Manager and Network adapters. Expand Network adapters. Check if your network adapter shows the No Internet Access or Limited connectivity message and select it. Right-click on your wireless network adapter and go to Update Driver Software.
Contact Your Internet Service Provider
If none of the above methods worked for you to fix Windows 10 internet not working, then contacting your ISP would be the right choice. Have a chat with them on call, tell them about the problem, and check if they can help from their side. Most of the ISPs offer chat assistance, too, so you can take advantage of that and get your problem fixed on live chat.
We hope you can restore the internet connectivity using one of the steps discussed above. Did these solutions help resolve windows 10 internet connection issues about Windows 10 internet not working? If we missed any other potential troubleshooting steps, please let us know.


